Email/Office 365
Northshore Technical Community College uses Microsoft's Office 365 for email.
- What is my student email address?
- How do I log into my NTCC email account?
- How long can I use my student email address?
- OneDrive
- How to open a shared email mailbox.
- How to create a signature in Outlook
- How to create a Contact List in Office 365
- How to create an Out of Office message in Outlook
- How to use Outlook to search employee phone numbers.
- Reserving Rooms and Vehicles
- How to view Rooms calendar.
- What is my NTCC employee email?
- Scheduling Recurring Events
- Organizational Chart
What is my student email address?
Your student email address is your LoLA user name followed by "@my.northshorecollege.edu". For example, a student named Steve Jobs would have the LoLA user name "stevejobs". His email address would be stevejobs@my.northshorecollege.edu.
Please use your full email address to log into your email.
NOTICE: Sometimes your email may contain an number behind it depending on how my other students have the same last name as yours.
How do I log into my NTCC email account?
ATTENTION: All NEW students will need to reset their password with Password Reset Tool before logging into their College email account for the first time.
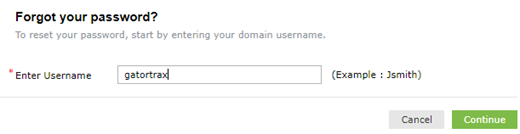
To reset your password.
1.) Go to www.northshorecollege.edu and select the GatorMail link located on the top menu bar.

2.) Scroll down till you see the GatorMail Password Reset Tool. Click on the link.
3.) Enter the part of your username that is before the @my.northshorecollege.edu. It would be the same as your LoLA username.
For NTCC faculty/staff it will be before @northshorecollege.edu.
Click Continue
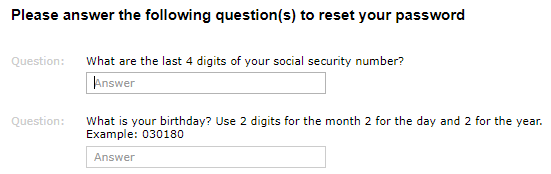
4.) Enter the last 4 of your Social Security Number in the field for the SSN
5.) For Students: Enter your birthday into the birthday field in the format MMDDYY. For example, if your birthday is July 4, 1976, you would enter 070476
For Faculty/Staff: It will generally be the 2 digit month and 2 digit day. No year.
6.) Enter the characters shown in the CAPTCHA picture and click Continue
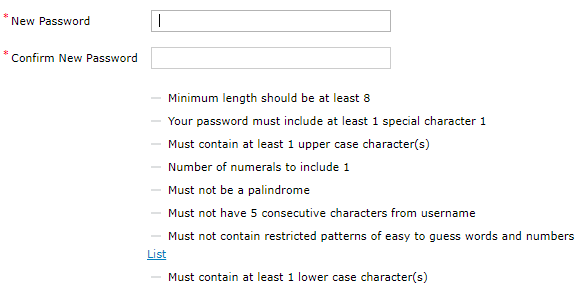
7.) Enter a password that meets all of the password requirements. When you have created a satisfactory password, all of the requirements will have a green check next to it
8.) Enter the characters shown in the CAPTCHA picture and click Reset Password.
9.) Wait 3 minutes for the password to sync to the cloud
10.) Log into your email at http://northshorecollege.edu/webmail
Reminder: Students use @my.northshorecollege.edu for their logins while Faculty/Staff use just the @northshorecollege.edu. If you are having trouble logging into your email, check to make sure this is correct.
To log into your email account.
Please allow between 2 to 5 minutes before trying to log in after you reset your password so that the email servers will have time to sync your new password. Failure to do so will show an incorrect username/password error. Too many failures will lock your account and you will have to wait 15 minutes for the account to automatically unlock.
HOW TO LOGIN STUDENT EMAIL ACCOUNT
1. Go to
www.northshorecollege.edu/webmail or
www.northshorecollege.edu and click on the GatorMail link on the home page.
2. Scroll down the page and click on the "GatorMail Login" link
2. Enter your full email address which is the same as your LoLA username + my.northshorecollege.edu (example:
LoLAusername@my.northshorecollege.edu)
3. Enter your email password (will not be the same password as your LoLA password)
HOW TO LOGIN FACULTY/STAFF EMAIL ACCOUNT
The same as the students except you will have @northshorecollege.edu instead.
You will also be prompted for your 2-Factor Authentication.
How long can I use my student email address?
You can use your NTCC student email address as long as you are a student.
-
If you are graduating soon, please save any important information prior to your graduation date.
-
Change out any accounts you have that use your student email to a personal one so you do not lose access to those accounts.
OneDrive
When you need to add files/folders to your OneDrive.
Accessing the desktop app.
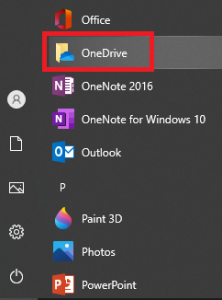
1.) Click on the Windows button and scroll till you see OneDrive.
2.) Click on OneDrive
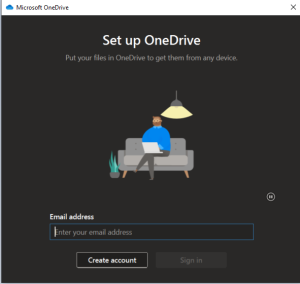
If you have not set up your desktop OneDrive, you will be prompted to do so once you clicked on OneDrive. Follow the prompts to sign in.

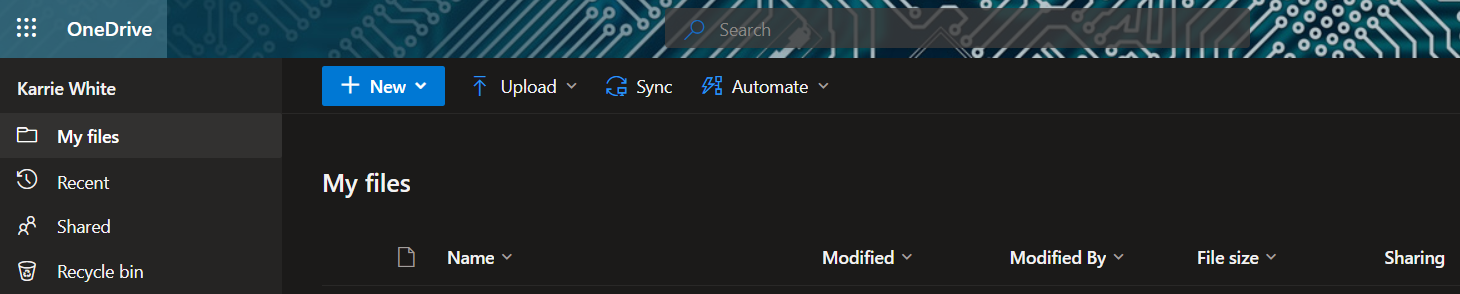
3.) Your desktop OneDrive will look like any File Explorer for Microsoft. What you do in your desktop OneDrive will affect your web version of OneDrive and vise versa.

Accessing the web version.
1.) Log into your GatorMail like normal.
2.) Once you are in your Office 365, click on the OneDrive icon.

3.) You are now in your OneDrive and can add/remove/share files as needed.
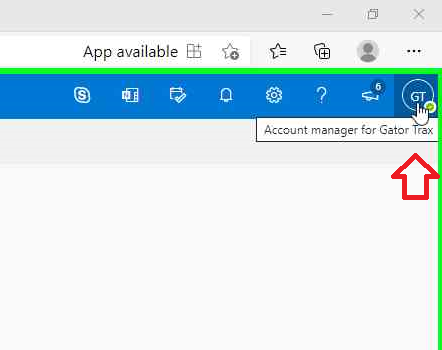
How to open a shared email mailbox.
If you have been granted access to a shared email mailbox, you can access it from webmail easily.
1. Open your webmail. You should see your list of emails in your inbox or other folder.
2. Click on your initials or picture in the upper-right corner of the screen (depending on whether you have uploaded a profile picture or not.
3. Click on "Open another mailbox".
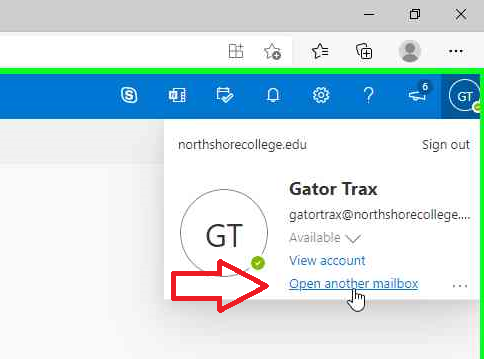
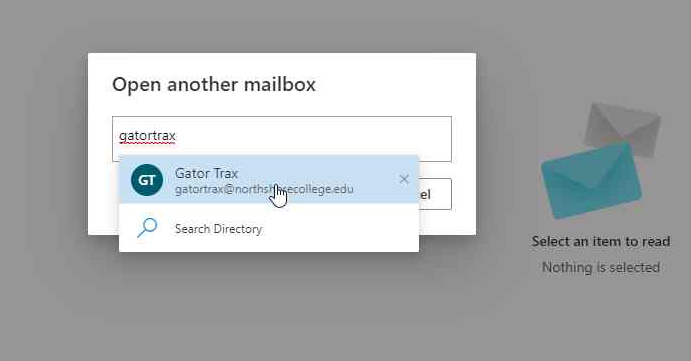
4. In the Open another mailbox dialog box that opens up, start to type the email address/name of the mailbox you are trying to open. Autocomplete should find the mailbox.
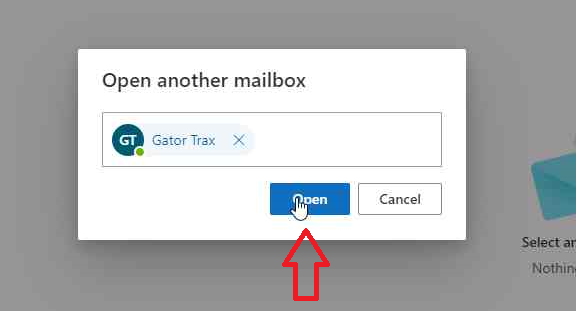
5. Click "Open" to open the mailbox
If you receive an error message like the one below that says "Something went wrong. You don't have permission to perform this action," you do not have permissions to access this mailbox. If you feel that you should have access to that shared mailbox, please have the manager of that shared mailbox submit a helpdesk ticket to request that you be given access. This helpdesk ticket must come from the manager of the mailbox. IT will not grant access to shared mailboxes without the permission of the manager who controls that mailbox. 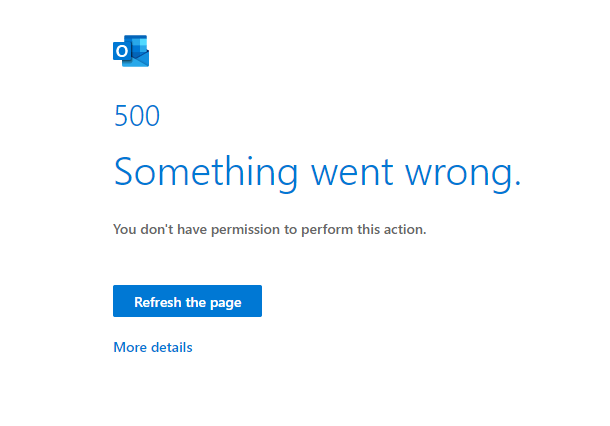
How to create a signature in Outlook
When you want to have a customized signature in your emails.
Click on images to enlarge.
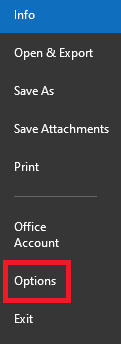
Creating a signature in the desktop app.
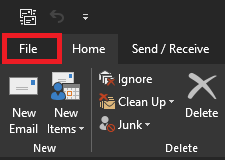
1.) After opening the Outlook desktop app, select the File tab.

2.) Click on Options.
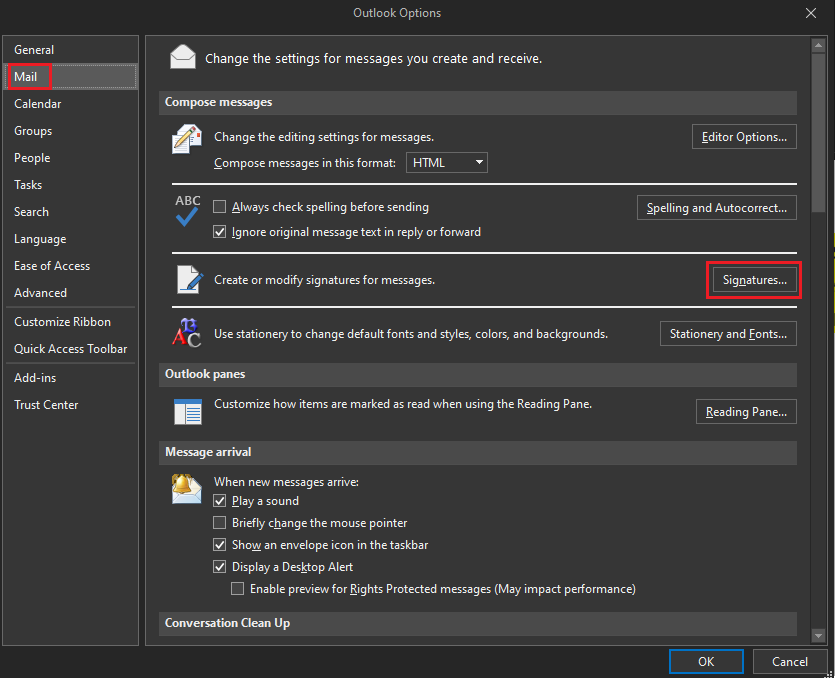
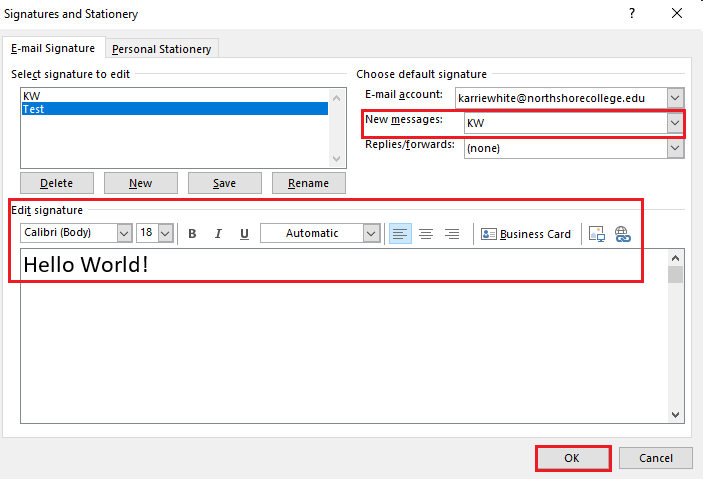
3. Click on Mail then click on Signatures.
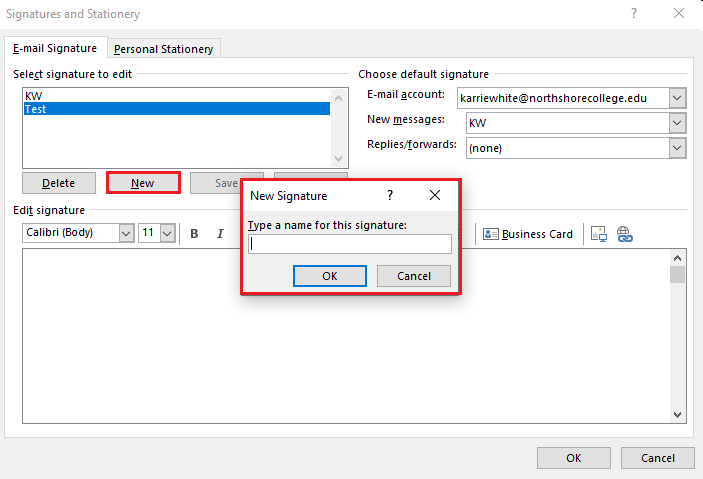
4. Click New and type what your want the signature to be called then OK.
5. Write your message in the Edit signature box.
Note: Make sure you use the drop down box for New messages: to select the signature you want to use. You can also choose to have it for replies and forwards as well.
6. Click OK.
Creating a signature in the web app.
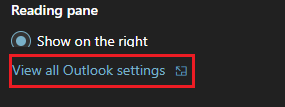
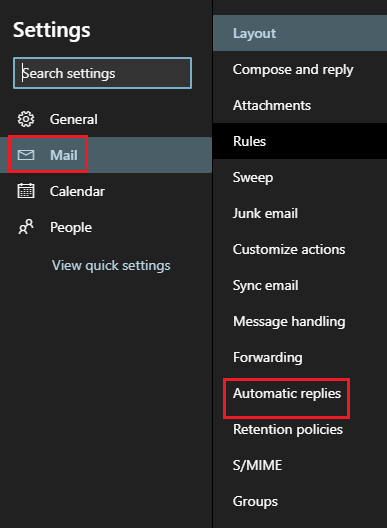
1.) Sign into Gatormail like normal. At the top right corner, select the Settings icon.
![]()
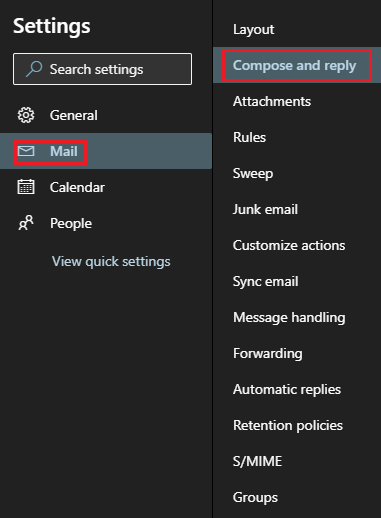
2. At the bottom of the newly opened panel, click View all Outlook settings.

3. Select Mail then select Compose and reply.
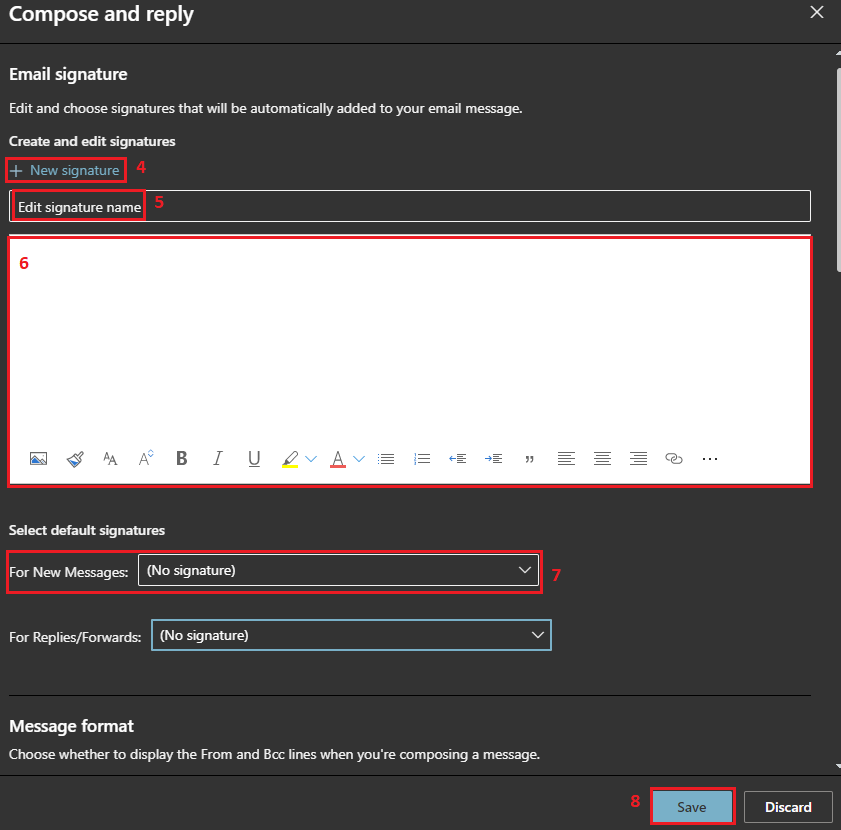
4. Click + New signature.
5. In Edit signature name create a name to identify your signature.
6. Create your message for the signature.
7. Make sure you use the drop down box for New messages: to select the signature you want to use. You can also choose to have it for replies and forwards as well.
8. Click Save.
How to create a Contact List in Office 365
Use a contact group (formerly called a “distribution list”) to send an email to multiple people
Click on the images to enlarge.
Desktop Guide
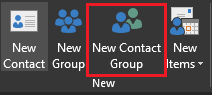
1.) Select People.
2. Select New Contact Group.
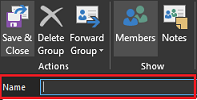
3.) Name your group.
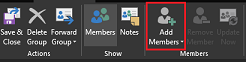
4.) Select Add Members.
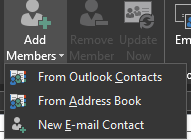
5.) Choose From Outlook Contacts to add people from your contacts.
Choose From Address Book to add people within the NTCC Global Address list.
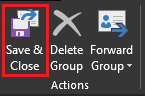
6. Save & Close
Webapp Guide
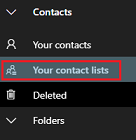
1.) Select People.

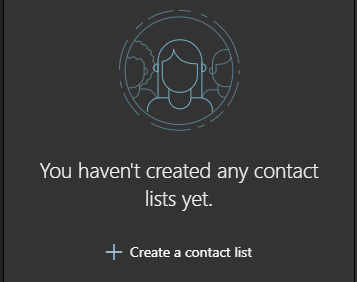
2.) Select Your contact lists.
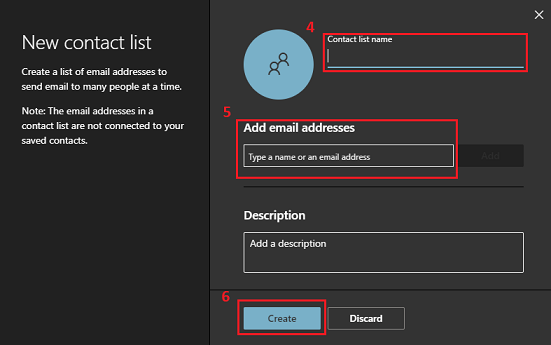
3. Select +Create a contact list.
4. Name your list
5. Type the names to search and add emails
6. Create
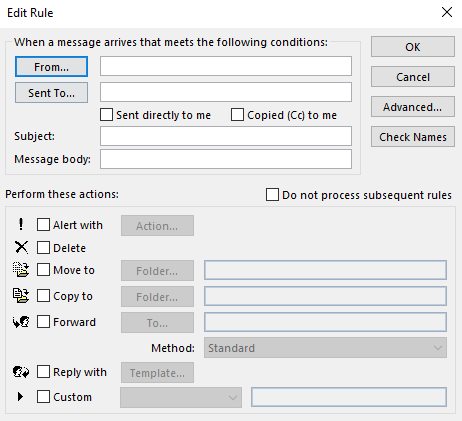
How to create an Out of Office message in Outlook
When you need to have an automated message sent when not in office.
Create an OOO on desktop app.
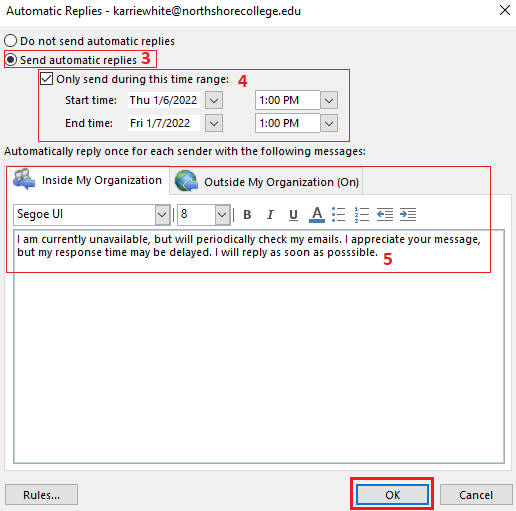
1.) 1. After opening the Outlook desktop app, select the File tab.
2.) Click on the Automatic Replies button.

3.) Choose Send automatic replies
4.) Click the Only send during this time range: box. Then choose your dates and times when you will be out of office.
5.) Create your message.
6.) Click OK.
NOTE: Best security practice is to give as little information about your absence as possible. No locations and if possible no dates. Avoid having the Outside My Organization or a contact if possible. If not possible, continue to provide as little as information as you can.
OPTIONAL: You can set up rules for your messages. On the left hand bottom corner click Rules...
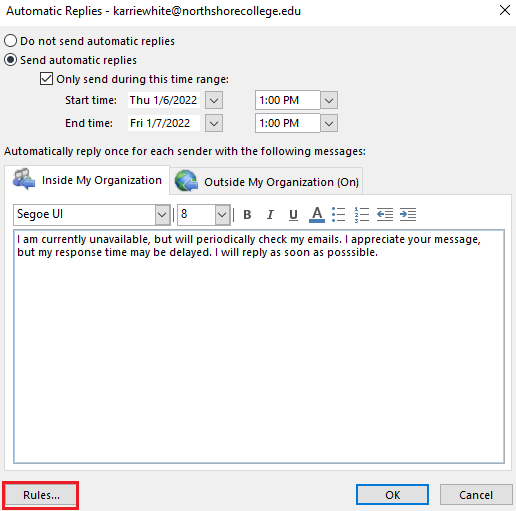
Click on Add Rule...
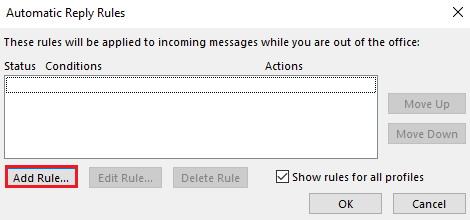
Set up the various rules you wish to have, including automatic forwarding to certain individuals. You can create multiple rules to really customize your messages.
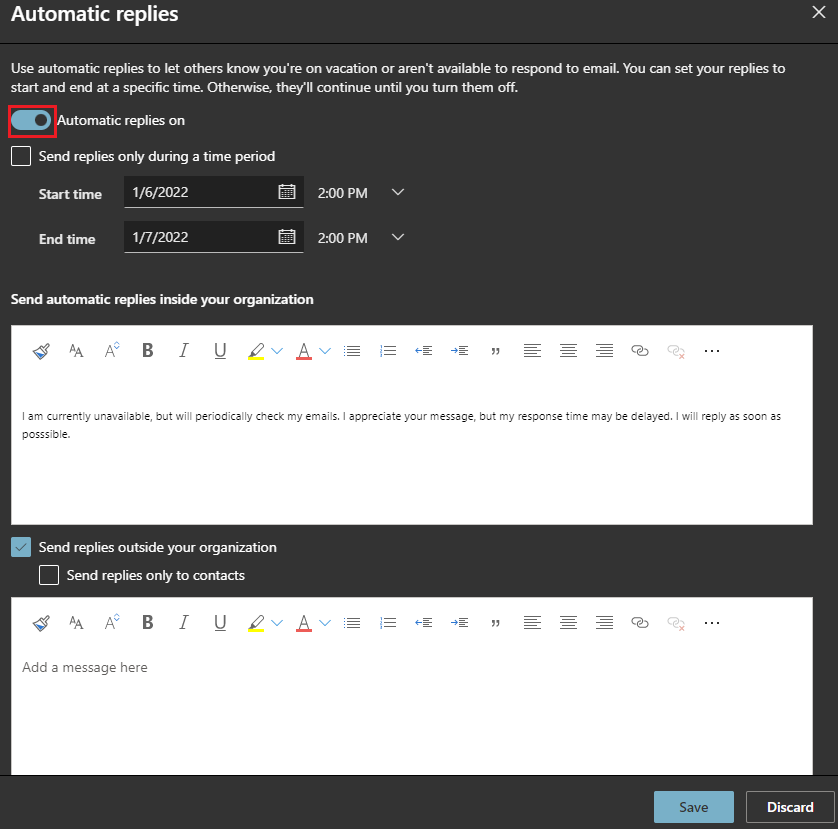
Create an OOO in the web app.
1.) 1. Sign into Gatormail like normal. At the top right corner, select the Settings icon.
![]()
2. At the bottom of the newly opened panel, click View all Outlook settings.
3. Select Mail then select Automatic replies.
4. Click on the Automatic replies on button. Fill out like you would in the desktop app.
5. Click Save.
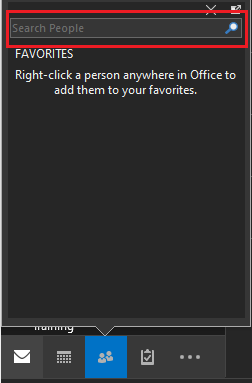
How to use Outlook to search employee phone numbers.
To use Outlook to lookup Faculty/Staff work phone numbers
Searching with desktop app.
1.) Hover the mouse over People.
![]()
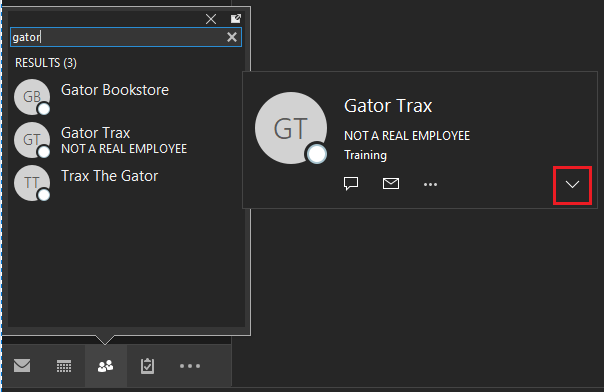
2.) In the Search People bar, type the name of the person you are looking up.
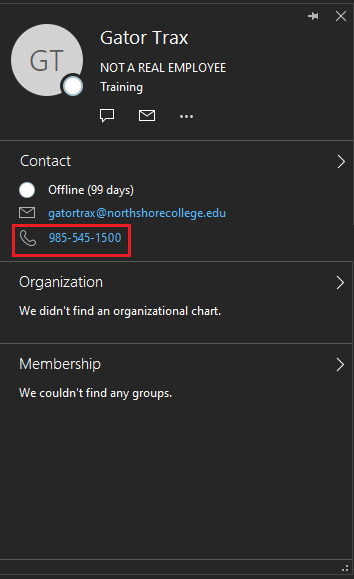
3.) Once you have started your search, you can hover over the name to expand details. Click the ▼ Open Contact Card.
4.) With the expanded view you can now see phone number.
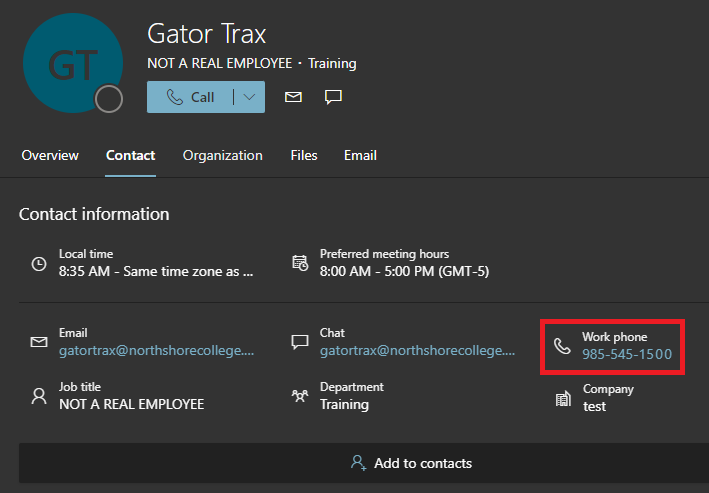
Searching with the web app.
1.) Select People.
2.) Type the name of the person in the search bar at the top of the page and click on that person.

3.) Contact details are show.
Reserving Rooms and Vehicles
Students are only permitted to book Learning Commons Collaboration Rooms (currently only Lacombe-Collaboration Room 201B)
Click on images to enlarge.
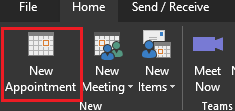
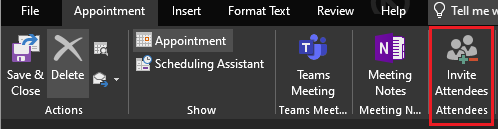
Reserving through desktop app.
1.) Go to Calendar and select New Appointment at the top tool bar.
2.) Click Invite Attendees.
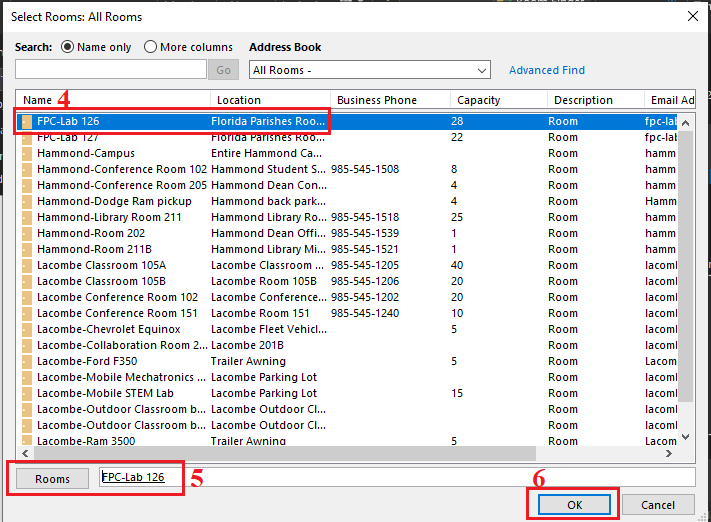
3. Click Rooms... at the end right-hand side of the window under Subject.
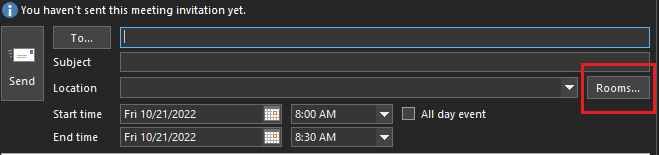
4. Select the vehicle or room you wish to reserve.
5. Click Rooms so that the bar next to it shows the one you want.
6. Click OK.
7. Fill out the rest of the details and click Send
8. Once you send the appointment, you will receive an email stating that the appointment has been set on the calendar. If the vehicle or room requires approval, the approver will receive an email notifying him or her of your request. You will be notified once the approver approves or declines the request.
Reserving through webmail.
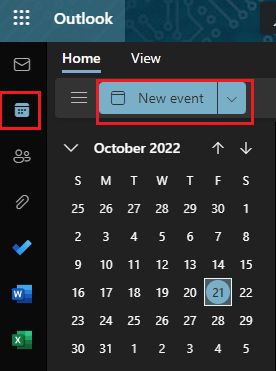
1.) In webmail, go to Calendar and select New Event at the top tool bar.
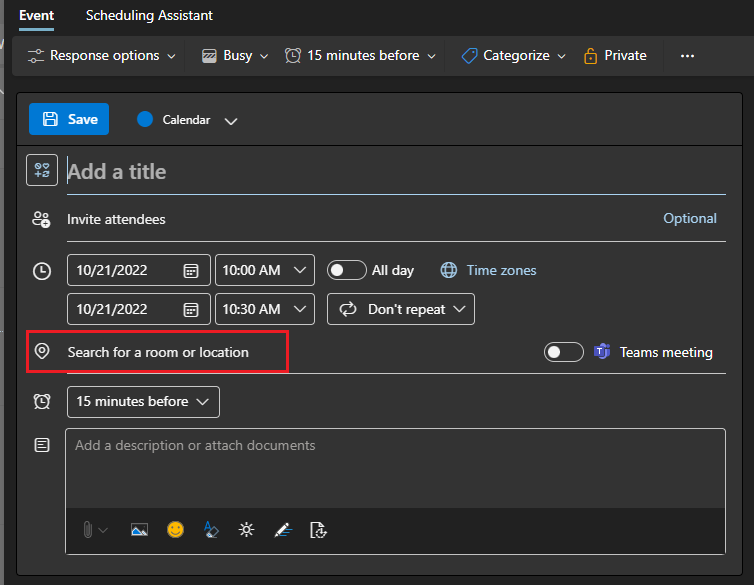
2.) Click Search for a room or location.
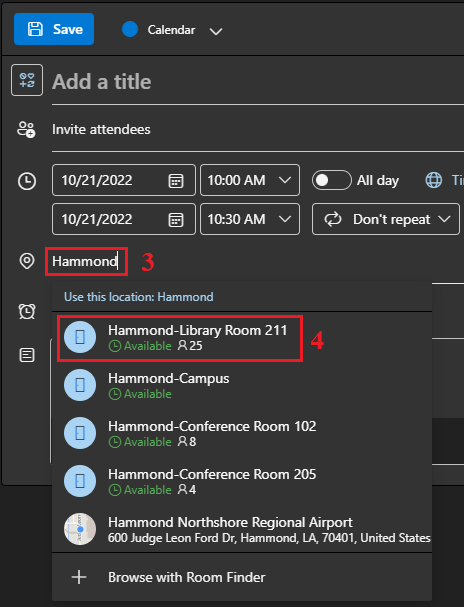
3. Type in the search bar the room or vehicle you are looking to reserve.
4. Click on the location to select it.
5. Fill out the rest of the details and click send.
6. Once you send the appointment, you will receive an email stating that the appointment has been set on the calendar. If the vehicle or room requires approval, the approver will receive an email notifying him or her of your request. You will be notified once the approver approves or declines the request.
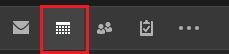
How to view Rooms calendar.
When you want to see if a room/vehicle is available.
Using the desktop app.
1.) In the desktop app, click on the Calendar icon at the bottom.
![]()
2.) At the top tool bar, click on Open Calendar.
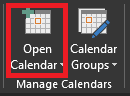
3.) From the drop down list select From Room List...
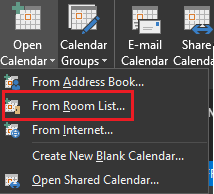
4.) Double click on room you wish to view then click OK.

5.) Now you can view the room.
Using the web app.
1.) In the web app, click on the Calendar icon then select Add calendar.
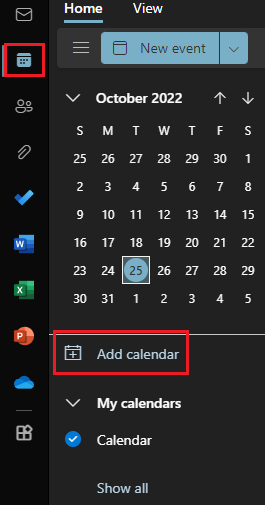
2.) Click Add from directory then type the name of the vehicle or room you wish to add.
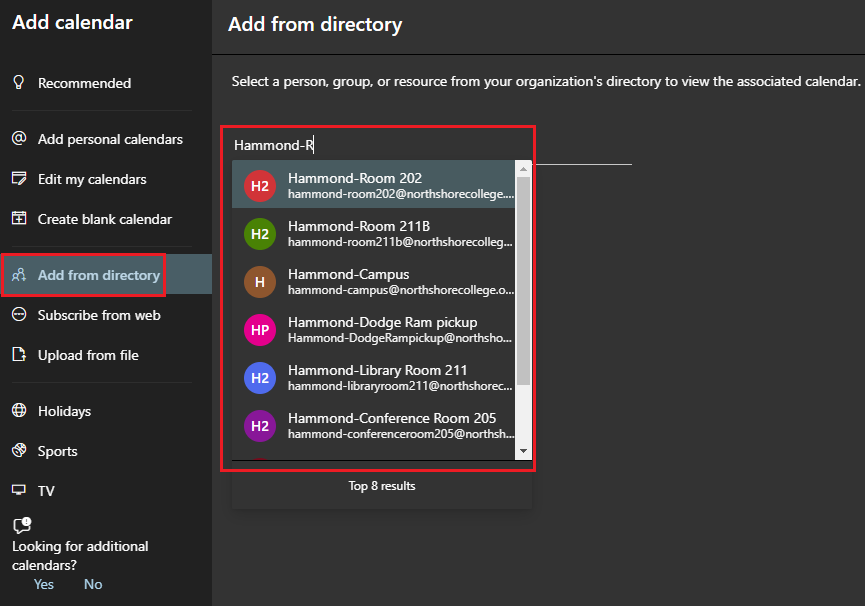
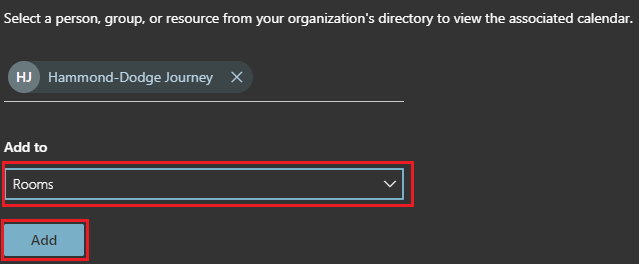
3.) Under Add to, use the drop down box to select Rooms. Click Add.
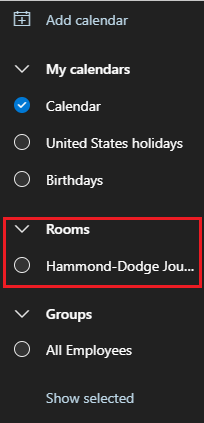
4.) You can select the calendar to view it.
What is my NTCC employee email?
-
Your email is your LoLA username+@northshorecollege.edu such as gatortrax1@northshorecollege.edu
-
Your username is the first part of your email without the @northshorecollege.edu
-
Always use lowercase for username and emails.
Sometimes your username is not the same as your LoLA. Your supervisor will inform you if this is the case.
Scheduling Recurring Events
Introduction
Scheduling recurring events is a great way to better define when an event that is spanning multiple days is occurring on your calendar. For example, a meeting that is happening Monday through Wednesday between 9am and 4:30pm.
Step-by-Step
Webmail
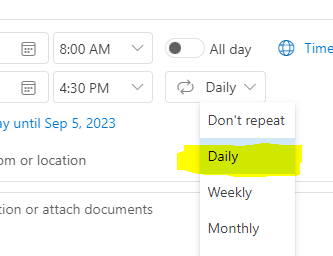
- Log into your NTCC webmail, then go to the calendar
- Click on New Event
-
- Select the date and times that the first day of the multi-day event occurs
-
- Select Daily under the repeat dropdown
-
-
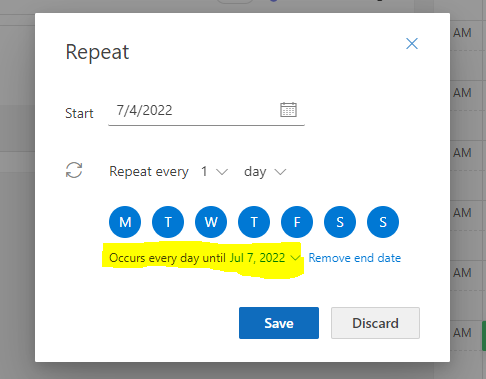
Choose to repeat the event every day applicable. Be sure to set the end date to the last day of the event
-

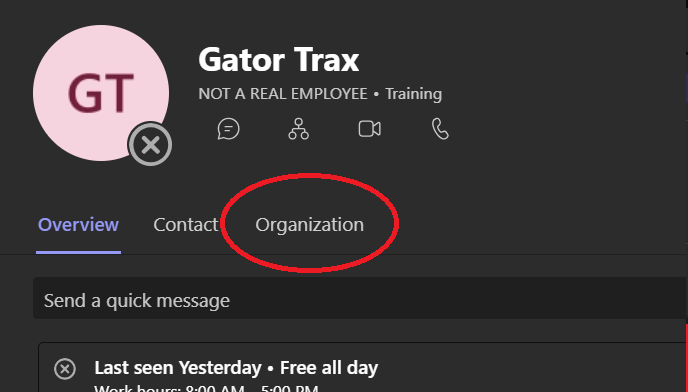
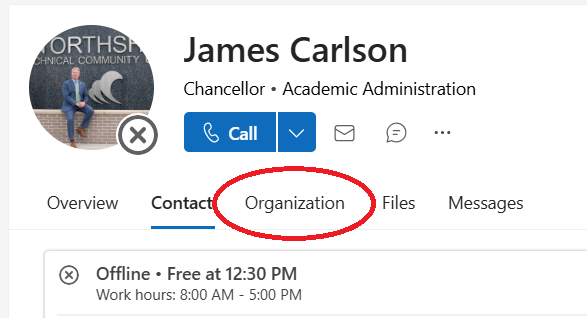
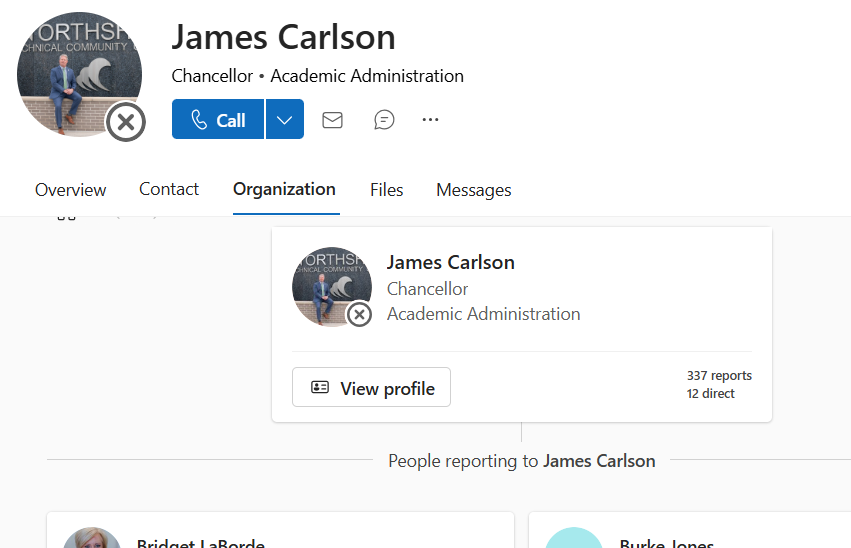
Organizational Chart
There may be times when you need to determine who a person reports to, or who are a person's direct reports. Office 365 has this information available. Please note that some employees have multiple supervisors. In cases where a person has multiple supervisors, only that employee's primary supervisor is listed.
Webmail
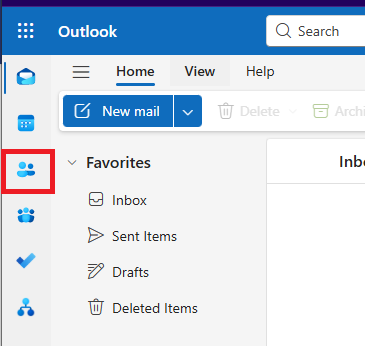
1. From webmail, click the People icon in the left-hand column
2. Use the search bar at the top of the screen to search for the desired person
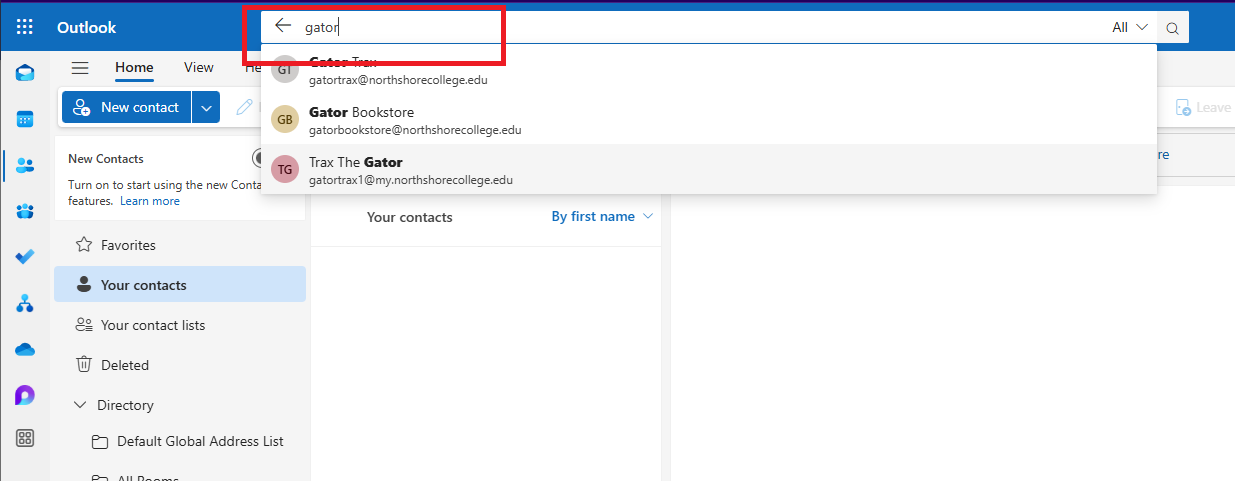
3. Click on the person's name, and their contact card will show
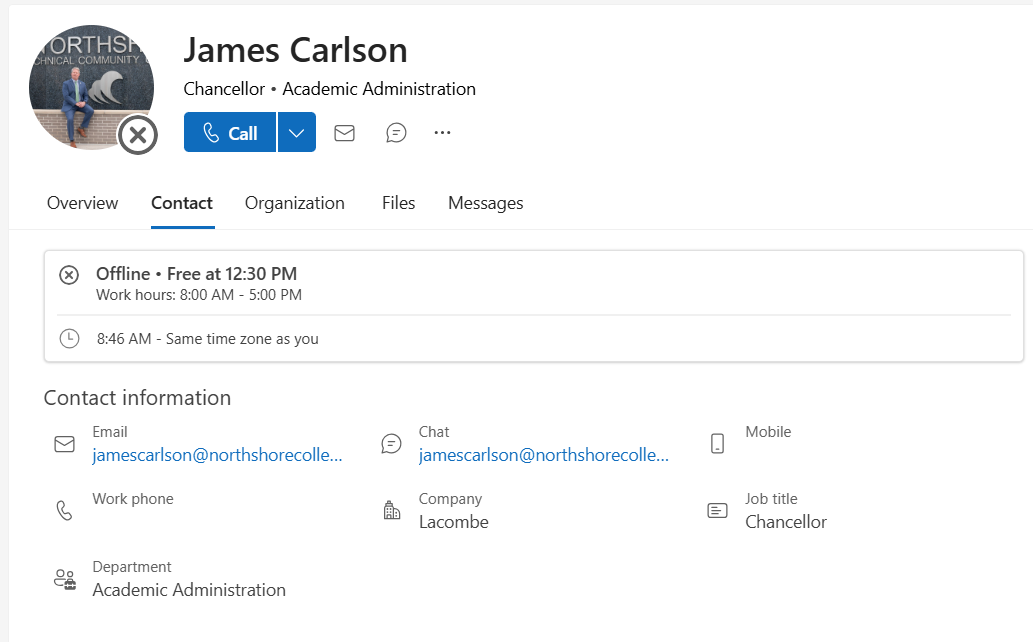
4. Click the organization button to show the organizational chart
5. The organizational chart will be visible and show who the person reports to and their direct reports
Microsoft Teams Desktop
1. Open Teams and search for the person in the top search bar
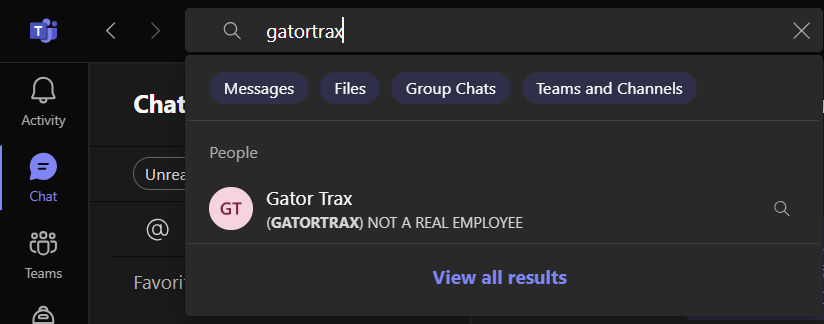
2. Click on the person's name in the results. This will bring up a chat window for the person
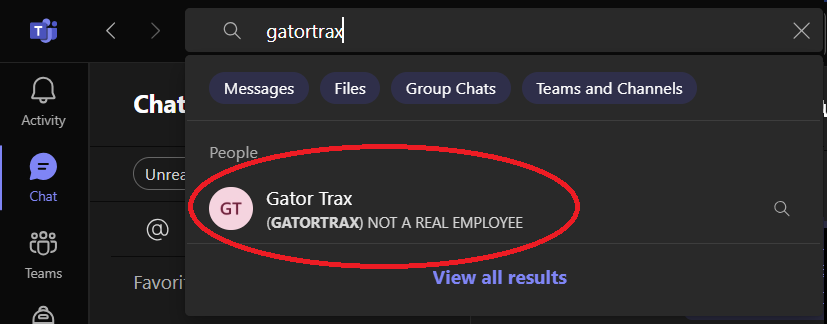
3. In the top of the chat window, click on the person's name. You may have to click on their name twice to bring up the full contact card. Click on the organization tab to show the organizational chart.