Software
- Changing default applications in Windows.
- Install Software from Software Center
- Calibrate smartboard touch
- Duplicate or extend monitors/screens
- Logging into Office applications error CAAC03ED
- Foxit
- Web Broswers
- ScreenPal
- Forget existing wireless network
- Smartboard Display/Touch issues
Changing default applications in Windows.
If you need to change your email or other default applications.
1.) Click on the Windows Start icon at the bottom of your screen.

2.) Start typing apps and select the Apps & features that shows as you type.

3.) On the left hand side, select Default apps

4.) Select the main default app you wish to switch by clicking on the icon under the type. You can also choose by file type or protocol at the bottom.

You must change email to Outlook if you wish to email from LoLA.
Install Software from Software Center
NTCC IT provides a mechanism for employees to install software on NTCC-owned computers without IT intervention. This is accomplished through Software Center. The Software Center application shows the user a catalog of applications and allows the user to select applications to install. The list of applications available varies depending on what department the user is a member of, existing software that is installed, available licenses, and other factors.
Screencast-O-Matic is used as an example. Please select the software you need to install from the list in Software Center.
Step-by-step guide
To access Software Center
- Click on the Start Menu button in the lower-left of the screen
- Start typing Software Center. Software Center will show up in the search results

- Click on Software Center in the results
- Browse the Applications tab for the application you are seeking to install. Note that the applications you will see will be based on what department you are a member of, existing software that is installed, available licenses, and other factors.
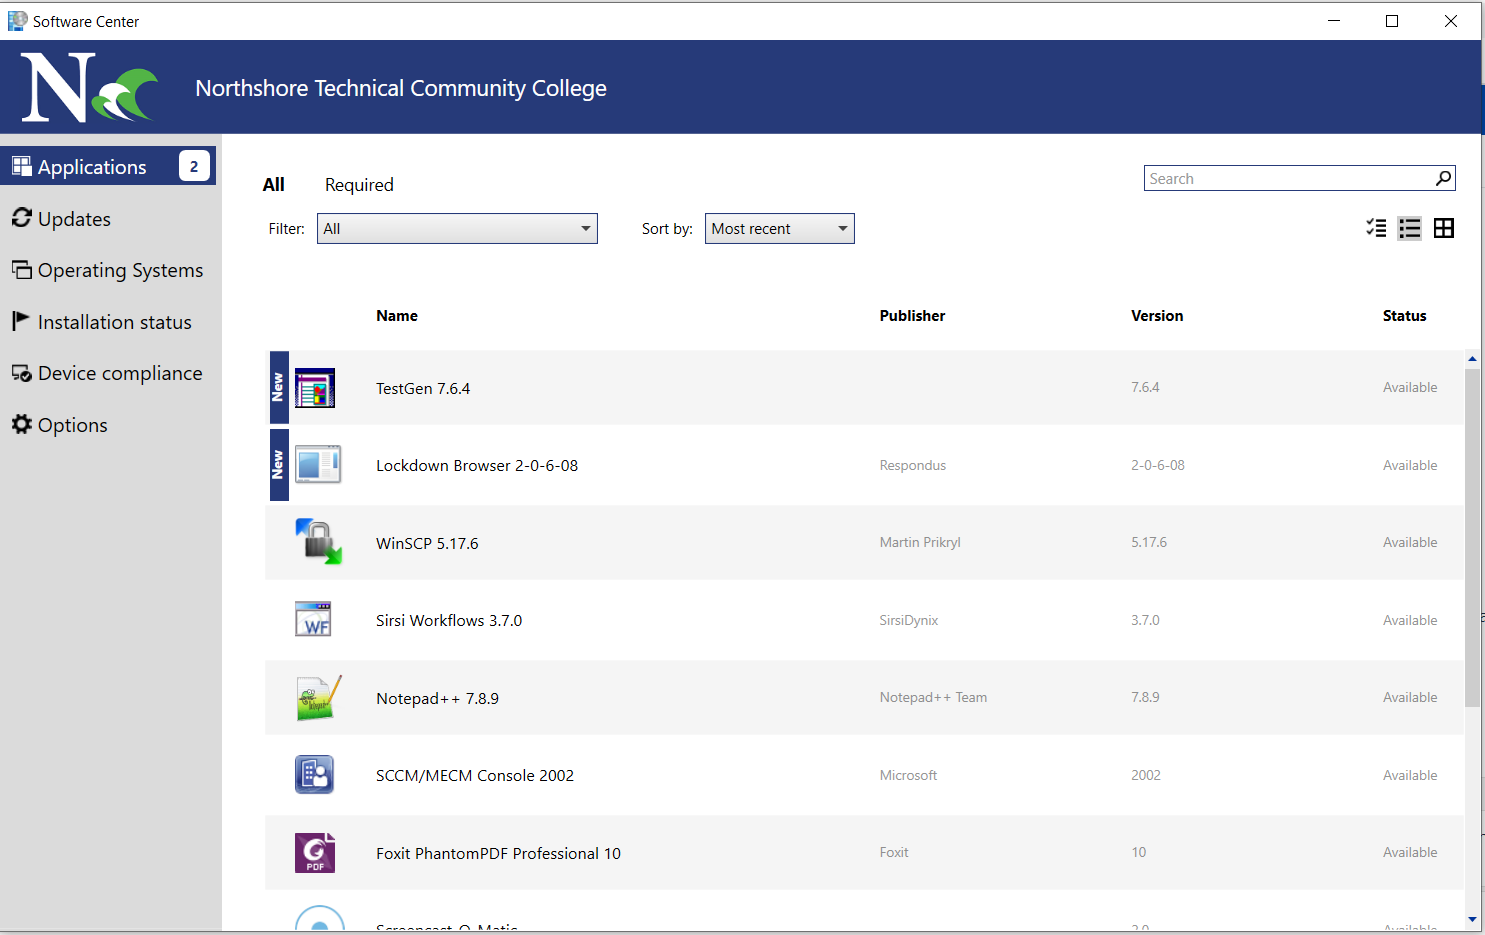
- Click the Install button for the application you want to install. Some applications may require IT approval; for those applications, the Install button will be replaced with a Request Approval button.

- Your application will be installed and ready to use. Please note that some applications can take significantly longer to install than other applications. (Autodesk applications, for example)
Dymo Software
The Dymo labelmaker software has a known issue where the installation reports as "Failed." This is not the case; the installer is still running. After 1-2 minutes, the Dymo labelmaker application will be successfully installed and Software Center will update its status to "Installed."
Test Banks/Exam View/Test Gen
Exam View replaced Test Gen. You can install Exam View by installing the Test Bank you need for your course. Once you install the Test Bank it will automatically also install Exam View.
Some test banks may initially report that the installation failed. This is not the case and is expected behavior. Clicking retry will result in the software being properly shown in Software Center as "Installed."
Calibrate smartboard touch
Occasionally, the calibration that the smartboard uses to detect where you touch on the board can get out of alignment. There is a tool built into Smart Notebook that allows you to recalibrate the alignment.
Steps
1.) Go to Windows button and start typing Product Drivers Orient on your keyboard. Search should find it in the SMART Technologies folder.
2.) Select Product Drivers Orient.

3.) With the calibration page up, tap in the middle of the red target with your Smartboard pen. You will be prompted to do so in different locations. Be as accurate as possible to touch the precise center of the target.
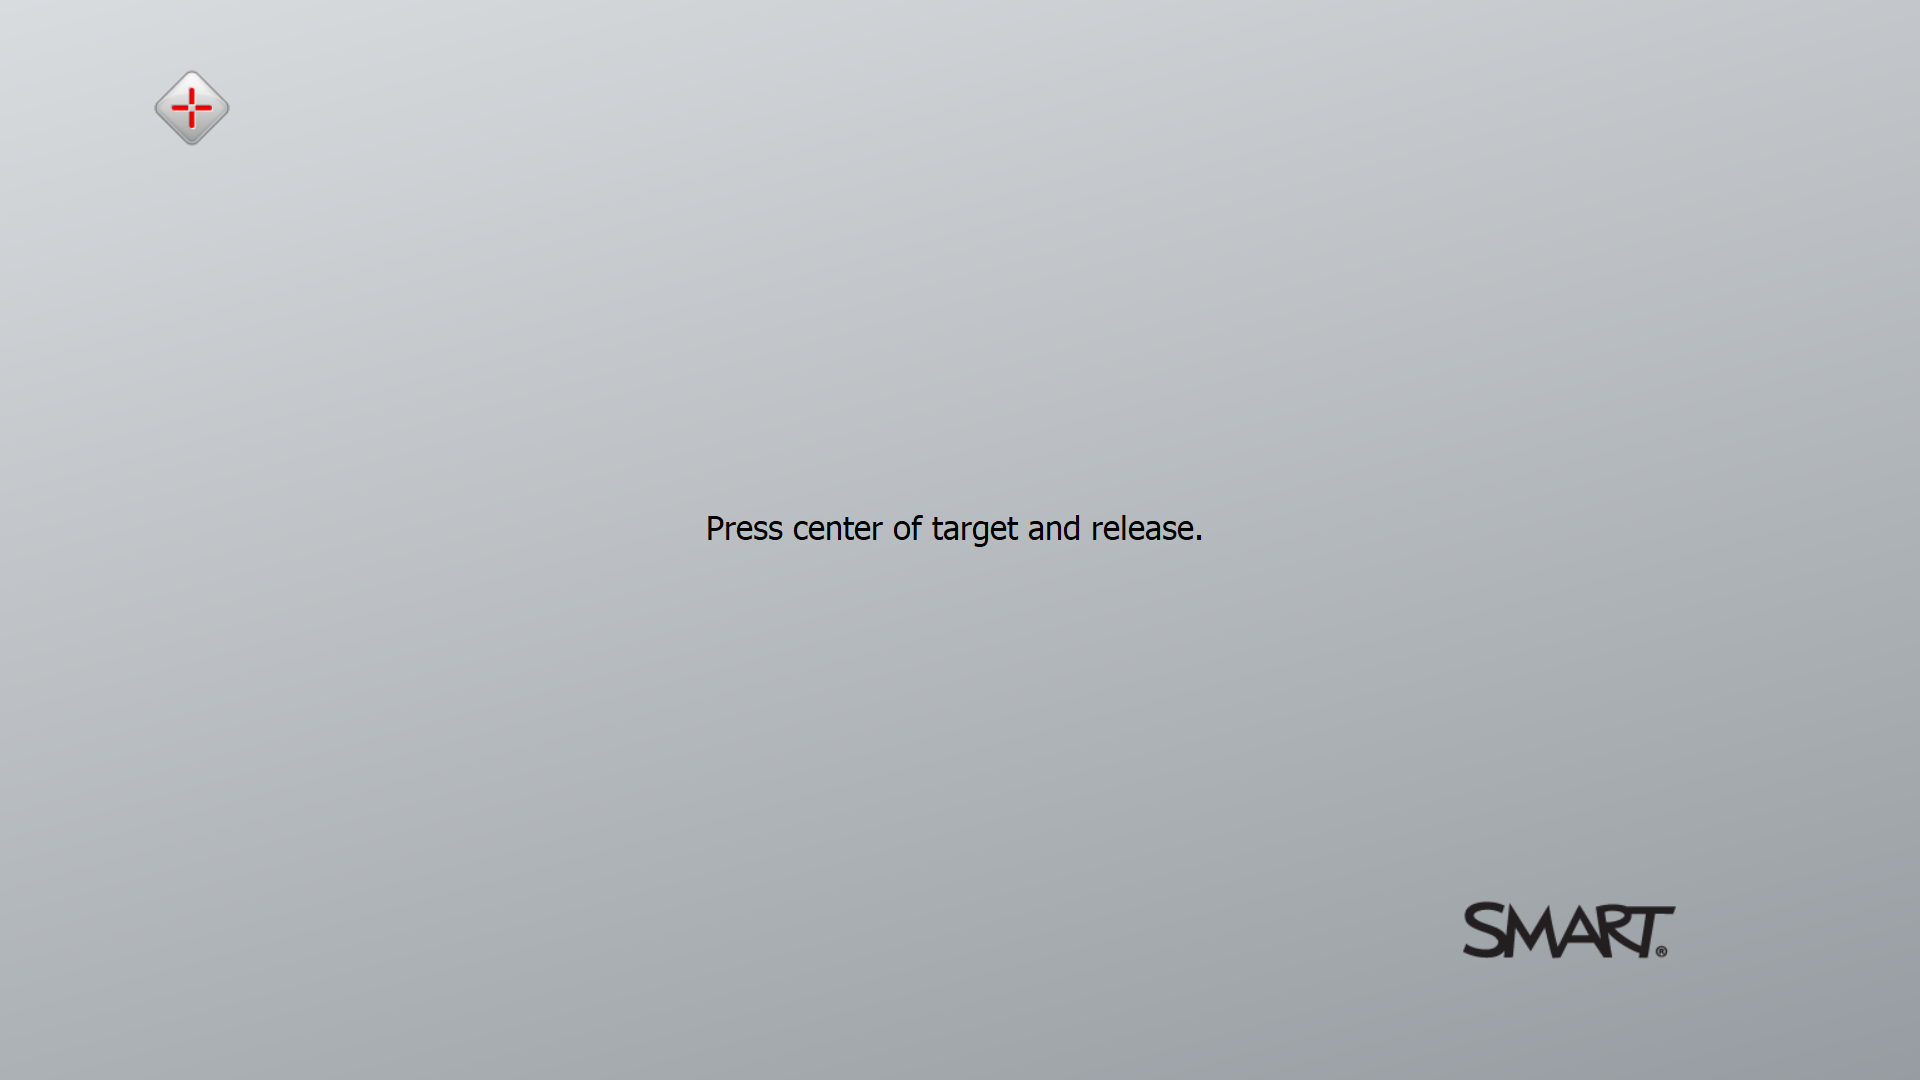
4.) You have successfully calibrated your Smartboard for writing.
If you get a message saying the Smartboard is not connected, please submit a helpdesk ticket so we can update your software.
Duplicate or extend monitors/screens
Introduction
Depending on whether you are in an office or classroom environment, you may want to change the configuration of your monitors to match the need. Additionally, when in an office, the monitors may be backwards left-to-right. Both problems are easy and quick to fix.
Duplicate or Extend Screens
In office environments, you'll typically want to extend your screens, so that you have more space to put your windows. In classrooms, you'll typically want to duplicate your screens so that what you see on your laptop screen is the same as what students see on the smarboard. By far, the easiest way to switch between these modes is to use the Windows+P menu.
Using Windows+P to switch modes
Push and hold the Windows key on the keyboard, then push the P key. You can then release both. A bar along the right side of the screen will pop up. Click the option you want to use and it will switch.

What the different options mean
PC Screen Only - See things on one display only.
Duplicate - See the same thing on all your displays.
Extend - See your desktop across multiple screens. When you have displays extended, you can move items between the two screens.
Second Screen Only - See everything on the second display only.
Show only on 1/2 - Same as PC Screen Only and Second Screen Only based on your monitor's identifying number.
Using display settings to switch modes
Alternatively, you can use the display settings control panel to switch modes and make other settings changes.
-
To access Display settings, right click on an empty part of the desktop and select Display Settings.
You can also do Start > Settings > System > Display
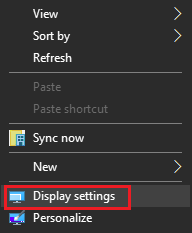
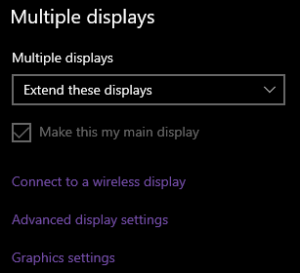

- In Display Settings, select the screen you wish to make adjustments to in the Rearrange your displays section.

Logging into Office applications error CAAC03ED
When logging into Teams/Outlook/etc.. you see the following error. This error is caused when you do not click the "sign into this app only" option on the previous window.
When you try to log into Teams and this is the error given to you.

With this error you can ignore the message and press continue. While the error is correct it does not actually do anything to affect your log in. NTCC has certain settings set to prevent other potential issues, but causes this error to occur.
Foxit
Open PDFs with Foxit
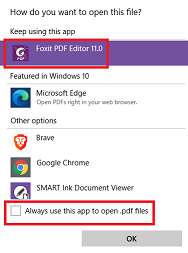
Users using Windows 10 and 11 may experience PDFs being opened by Microsoft Edge. While Edge can open PDF files, there can be situations where they cannot be printed or opened. Users should always use Foxit to open PDF files. This guide will demonstrate how to change the file association so that PDFs are opened by Foxit.
Step-by-step guide
- Locate a PDF file in Windows Explorer
- Right-click a PDF file. It doesn't matter what PDF it is, since we're changing the setting for all PDFs.
- Select "Open With"
- Select "Choose another app"

- A dialog box will pop up presenting a list of applications to open PDFs with.
- Check the "Always use this app to open .pdf files" checkbox.
- Choose Foxit PDF Editor, then click OK


Add and use a signature in Foxit PDF Editor?
Using Foxit PDF Editor, which is installed on all NTCC employee computers, you can sign documents using your real signature. The application allows you to "stamp" your signature anywhere on PDFs, as well as type in free-form text such as the date. This allows you to sign forms without printing them and re-scanning.
Adding a signature to Foxit PDF Editor
- Using a clean piece of white copy paper, sign your signature as you want it to be. Use black or blue ink to ensure a high contrast between your signature and the paper
- Scan the signature, or take a picture of it with the camera on your cell phone. If using a scanner, make sure to set it to scan in 600 DPI mode; anything less will result in a blurry image. If you take a picture of it, try to make your signature take up the entire frame of the picture and use plenty of light. Make sure no shadows are visible
- Save the resulting image in your Pictures folder
- If you scanned it using a NTCC copy machine, open the PDF file and use snipping tool to crop just the signature out of the PDF and save the snip to your Pictures folder
- If you took a picture of your signature with your cell phone, email the picture to yourself, then save it to your Pictures folder
- Open a PDF using Foxit PDF Editor The exact PDF file doesn't matter at this point; Foxit just needs a PDF open before it will let you continue with these steps
Version 11
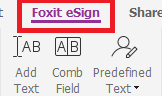
- Click on Foxit eSign
-

- Make sure the "Switch to Foxit eSign" shows. If it says "Switch to Ink", click on that to switch to show "Switch to Foxit eSign."
-

- Click on the import tab
- Click the upload signature button
- Find your signature file in the picker, then click open
- It will place your signature in the content block in the window. Verify it looks correct.
- Click OK

Applying your signature to PDF files
- Open the PDF you want to apply your signature to
- Click on the Home tab then Fill & Sign.
- Click on the picture of your signature. Now, when your cursor is over the PDF file, your signature will be visible
- Choose where you want to apply the signature and click the left mouse button. It will apply your signature.
- To resize your signature, click on the signature in the PDF you want to resize, then click on the square in the lower-right corner of your signature. Drag the mouse until the signature is properly sized. The application will keep your signature scaled properly
- To move your signature, click on your signature so that you see the outline. Then, click and drag the signature to the desired location.
- If you have to apply your signature to multiple locations, repeat steps 1-6 as needed.
Adding free-form text to PDF files
This is useful for when you need to sign and date a document. DO NOT use this procedure to add text to a document.
- Open the PDF you want to apply the text to
- Click on the Foxit eSign ribbon
- Click on either the Predefined Text dropdown, or the Add Text button
- If you are using Predefined text, choose the text you want to add, (most likely the date) then apply it to the document where needed. You can resize the text as needed
- If you are using the Add Text button, your mouse cursor turns into a text select icon. Click on the desired location in the document and start typing. You can move and resize the resulting text as needed when you have completed typing.
How to email a pdf in Foxit.
If you want to send an email of the pdf you have open.
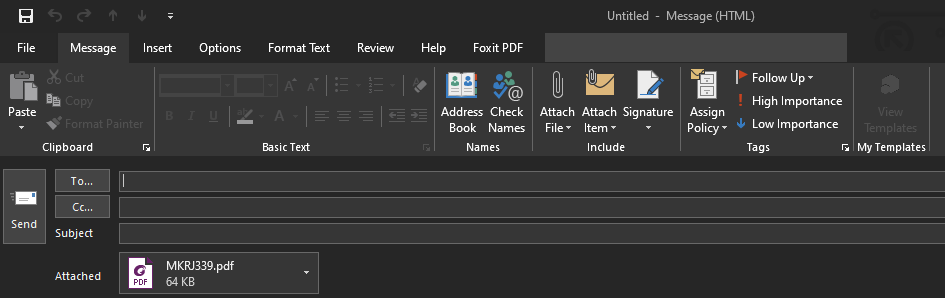
1.) If you want to send an email of the pdf you have open.

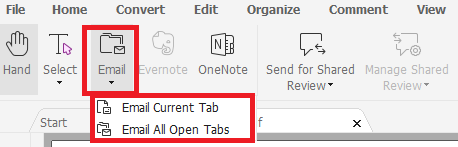
3.) Outlook will open up an email for you to send like normal.
Web Broswers
Chrome and Edge
How to clear your browser's cache.
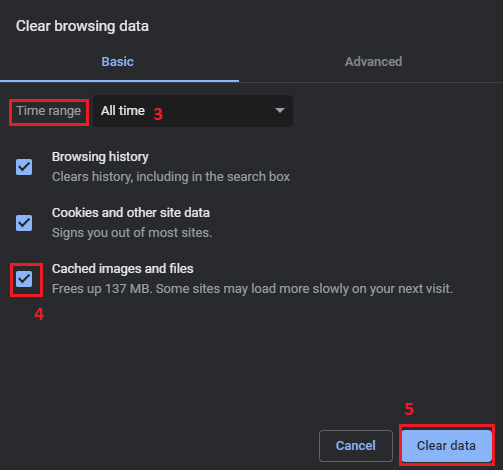
Clearing cache in Chrome.
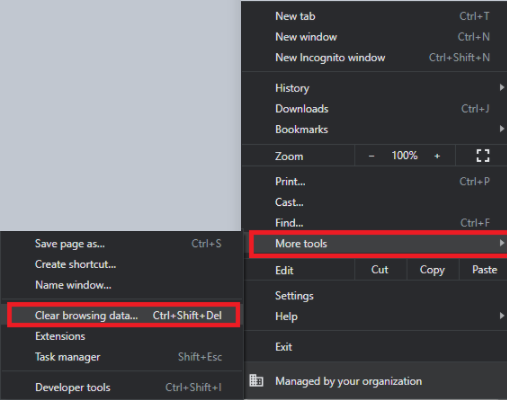
1.) With the Chrome browser open, click More (3 dots) at the top right.
2.) Click More tools > Clear browsing data...
3.) Select the Time range you would like to clear. To delete everything select All time.
4.) Click Clear data.
Clearing cache in Edge.
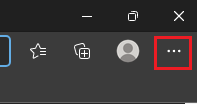
1.) With Edge browser open, select Menu (3 dots) at top right.
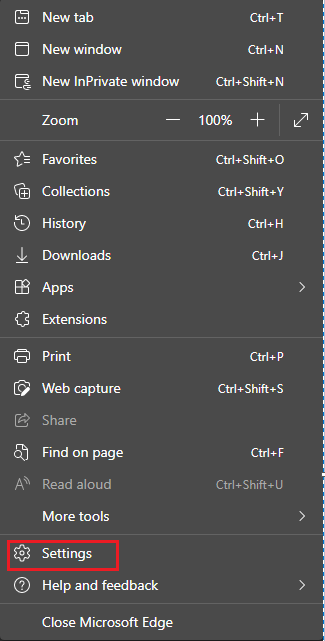
2.) Go to Settings.
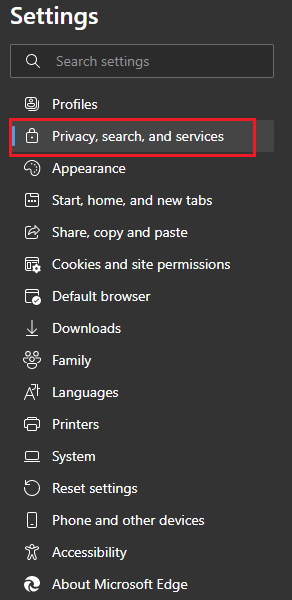
3.) On the left side of the screen, select Privacy, search, and services.
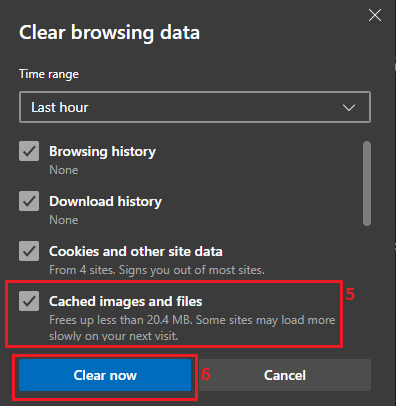
4.) Under Clear browsing data, select Choose what to clear.
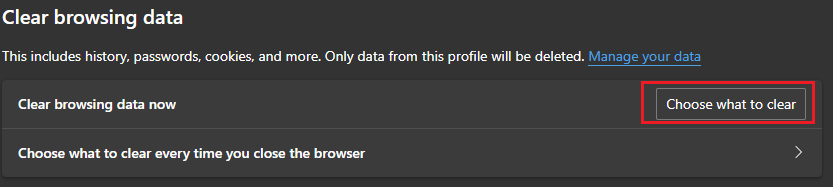
5.) Check the box next to Cached images and files. The other categories are optional.
6.) Click Clear now.
This is also how you would clear cookies in your browser. You would check the box next to cookies for both browsers.
Reset Chrome to factory default.
If Google Chrome is not reacting as expected, you may need to reset it back to factory defaults. Examples of issues included popups, unwanted notifications, or not ending up on the expected website. To reset Chrome follow the directions below.
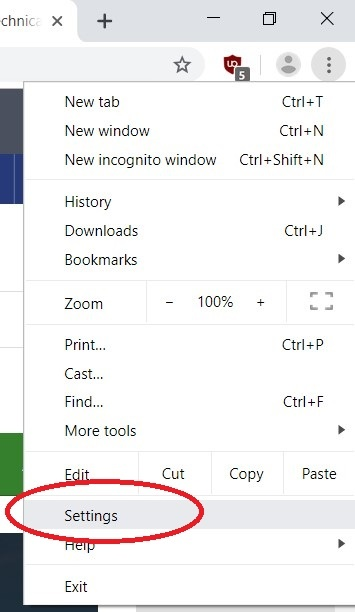
1.) Open Chrome and locate the 3 vertical dots in the upper-right corner then select Settings.
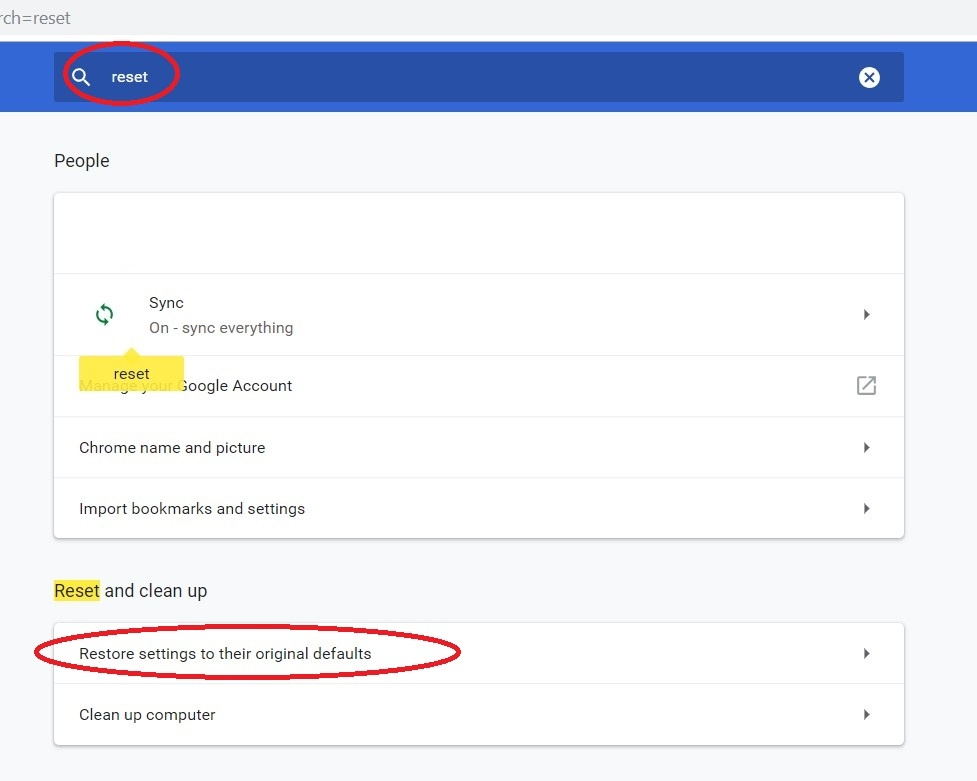
2.) In the search bar at the top of the settings page in the blue bar, search for "reset". Click "Restore settings to their original defaults."
3.) Click the blue reset button to reset Chrome back to default.
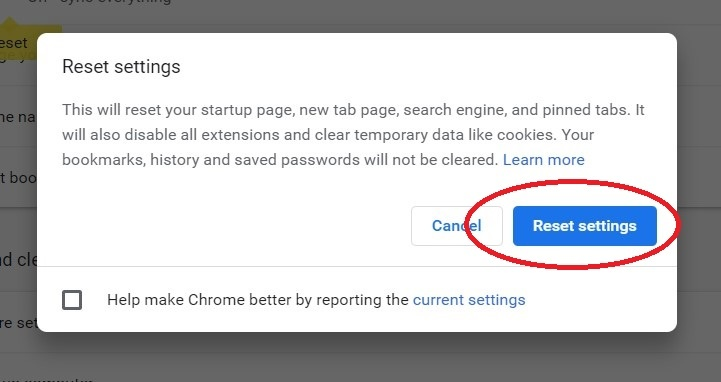
You may want or need to set your homepage back to https://www.northshorecollege.edu
ScreenPal
Reset ScreenPal app and account
If your ScreenPal recording is showing a max time limit and needs to be retethered:
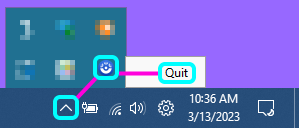
Exit and uninstall
- From the right side of the Windows taskbar, click to expand the system tray, right-click the ScreenPal icon, and select Quit.

- Click the Windows Start button and type Software Center then click enter.
- Uninstall ScreenPal
- .Reboot PC (this is critical)
Folder Cleanup
- Launch Windows File Explorer
- Copy this: %localappdata%
- Paste that into the File Explorer path field (not to be confused with the Search bar to the right)
-

- Click Enter
- Scroll Down and delete the following folders (if present):

- ScreenPal
- ScreenPal-v3
- Screencast-O-Matic-v2
Do not delete any Screencast-o-matic or ScreenPal folders anywhere else in the computer such as Documents folder.
Download and Install
- Go to Software Center again.
- Download ScreenPal
- Go to expanded system tray again and click on ScreenPal.
- Click on your initials or the bubble on the top right corner.
- Select log in.
- Sign in with your email and email password.
ScreenPal
What is ScreenPal?
Capture any area of your screen. Add audio narration or video from your webcam. Record lectures, tutorials, demos, and more!
NOTE: This is only available to NTCC Employees; it is not available for students.
You must install SceenPal on your laptop before you can use it. To install ScreenPal on your NTCC computer, please use Software Center. Please see this link for instructions on how to use Software Center: How to install software using Software Center. Support for installation of the software is managed by IT. Assistance on how to use the software is managed by Online Learning. Articles on how to use ScreenPal can be found in the Online Learning section of the knowledgebase.
Do not download ScreenPal from the website, only from Software Center. Any other version will cause issues.
How to install ScreenPal?
- If you do not have a ScreenPal account, place a ticket in the Online Learning Helpdesk to request permission to have your account set up for ScreenPal. This must be done PRIOR to installing ScreenPal on your desktop. If you have an account, proceed with installing the software.
- Go to the Software Center and install ScreenPal. See How to install software using Software Center for directions.
- Launch ScreenPal from your Start menu.
Linking ScreenPal to your account.
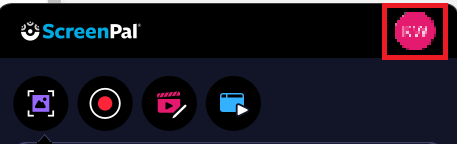
- On the taskbar at the bottom of your screen, click the up arrow and select the ScreenPal icon.
-

- When the ScreenPal box opens, click on the profile icon in the top right corner.
-

- Select the option to sign in.
- Follow the prompts on the website to sign in to your account.
- If your ScreenPal says you have a max time of 15, please submit a helpdesk ticket.
Do not try to record from the ScreenPal website. It will prompt you to download the software and will cause errors. Please only record from the app on your desktop. If you get an error saying the software is blocked, please submit a helpdesk ticket as this means the web launcher was downloaded and will need to be removed.
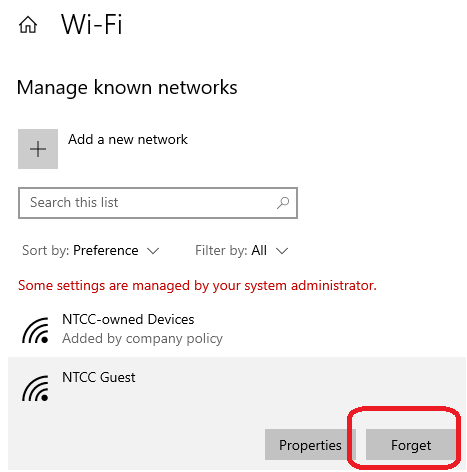
Forget existing wireless network
There are times when you may have issues connecting to a wireless network. This may be due to the settings on the wireless network being changed, or other reasons. A good first step in troubleshooting is to forget the network, and attempt to join again. Below are steps on how to forget a wireless network.
Networks added automatically on NTCC-owned computers cannot be forgotten. Those networks will say "added by company policy" next to them
Steps
- Click on the start button in the lower-left corner of the screen. In the search, look for wifi. Locate and choose Wi-Fi settings.
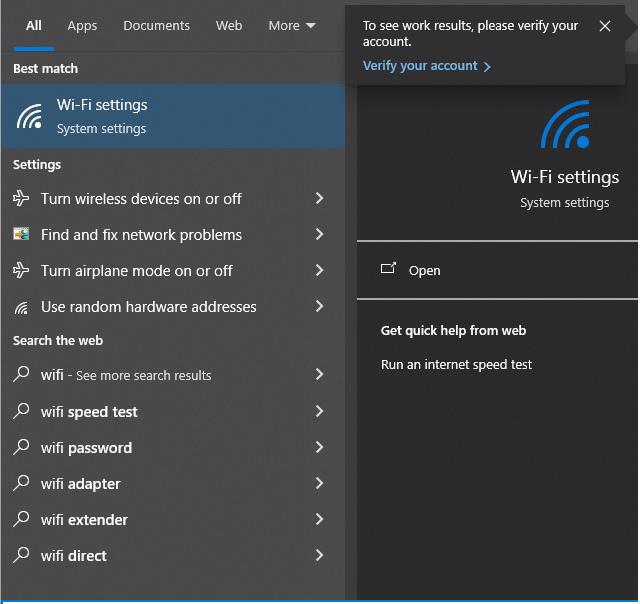
- Locate and choose Manage known networks. The look and location of the button differs on Windows 10 and 11
Windows 10
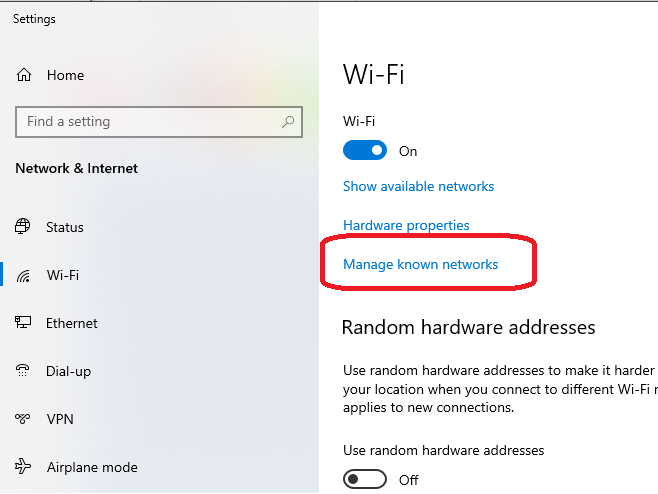
- Locate the network, and choose the Forget button